RBAC POC Brief
A custom RBAC (Role-Based Access Control) system needed to be developed for controlling user access to features within an application (as opposed to the typical binary does the user have access to the application or not, this required more granular access). A high-fidelity POC (proof of concept) was needed to illustrate how an Administrator might assign users to Roles, add Rules (an asset + it’s permissions together = a Rule) to a Role, and view what Rules or permissions were assigned to which users, etc. This required 2 main sets of screens: a series of System Screens, and a series of Edit screens. The System Screens were needed for gaining overall visibility into the system, and to give the administrator an easy and intuitive way to cross-reference Rules, Roles, and Users. In order to gain full context, we needed to be able to easily see the entire system from all perspectives. We needed to see what Rules a specific Rules was assigned to, as well as what users retained that Rule regardless of Roles. We needed to see from a User Perspective what Roles it was a member of, and what the permissions that user had (from the Rules) across all Roles. We also needed the same from the Perspective of a Role.
Up first is the basic template for the System Screen:

System Overview
This is the system overview screen. Nothing has been selected. You see in the panes, from left to right, the list of all Users in the system, the list of all Roles in the system, and the list of all Rules in the system with merged permissions. Merged permissions means that if the Cancel Flight asset is only create-enabled for one Role, and only read-enabled in another, on this screen we would see both enabled (colored in). Hovering over the permission component to any rule will tell you which roles have that permission enabled for that specific Rule. This simple but extremely effective method of visibility gives a greater amount of visibility into the system than 95% of all RBAC management UIs out in the market, regardless of industry. And we’re only on the first screen!
User perspective
Here we select “Bob (3)” from the list of users in the system. The (3) next to Bobs name indicates how many different Roles that Bob is assigned to. Wehn we click on Bob we see the following:
in the list of Roles, the Roles that Bob is assigned to are moved to the top of the list (so you don’t have to scroll and hunt) and highlighted.
In the list of permissions we see the aggregated/merged list of all of the permissions that Bob has across all of the Roles. Clicking on a specific Role in the 2nd column will alter the Rules and Permissions pane such that it shows only the Rules configuration for that specific Role.
Hovering over a specific permission in a rule, while the user Bob is selected will give you a list of those Roles in which that permission is enabled, but ONLY the Roles of which Bob is a member. IOW, if the User Account Delete permission is enabled in 5 different Roles, but only 2 of them are assigned to Bob, then hovering over this will only list those 2 Roles that apply directly to the User Bob (because Bob is specifically selected in the User column).
Role Perspective
The Role perspective is a little bit simpler than the User perspective. Click on a role and you can see the following
The list of users assigned to that Role (in the User pane, with the assigned users at the top of the light and Grey Highlighted)
All of the Rules and their specific Permissions for this Role
Note that in this model, ALL assets are listed for each Role by default. All Permissions for each Asset are turned off by default for this each Role, and can only be enabled deliberately. This effectively creates an implicit Deny All Rule. This means that the list of Rules in the Rules Pane will always remain the same. If the list becomes long, the search function will act like a filter adn narrow the list.
Rule Perspective 1
When initially clicking on a Rule We will see the following:
Any Role that has any of the permissions enabled for that Rule will be highlighted in the Roles pane.
Any user assigned to that Role(s) will also be highlighted.
Hovering over a specific enabled permission will present the user with a list of Roles that have that permission enabled for that Asset
It will NOT tell you which Users received this permission through which Role. IOW, we see that Sally has at least 1 Permission from This Rule enabled. However, we do not know if that is through the Dispatch Leader Role, or the Station Manager Role, nor do we know specifically which of those 7 permissions are enabled for Sally.
Rule Perspective 2
Here we are looking at the same screen as the previous one, but we’ve also clicked on the Role. This will now show us the intersection of the Users>Roles<Rules relationships held by both the specific Rule and the selected Role. To that end we see that:
Sally has only Read and Append ability for the “Cloak Flight” Asset, and that she gets that from the Station Manager Role. (User Perspective)
The Station Manager Role, which inly includes Sally in it’s membership, has only Read and Append permissions for the asset “Cloak Flight” (Role Perspective)
The “Cloak Flight” asset allows Sally to only Read and Append it, and these permissions are gained through the Station Manager Role (Rule Perspective)
Up next are the Edit screens
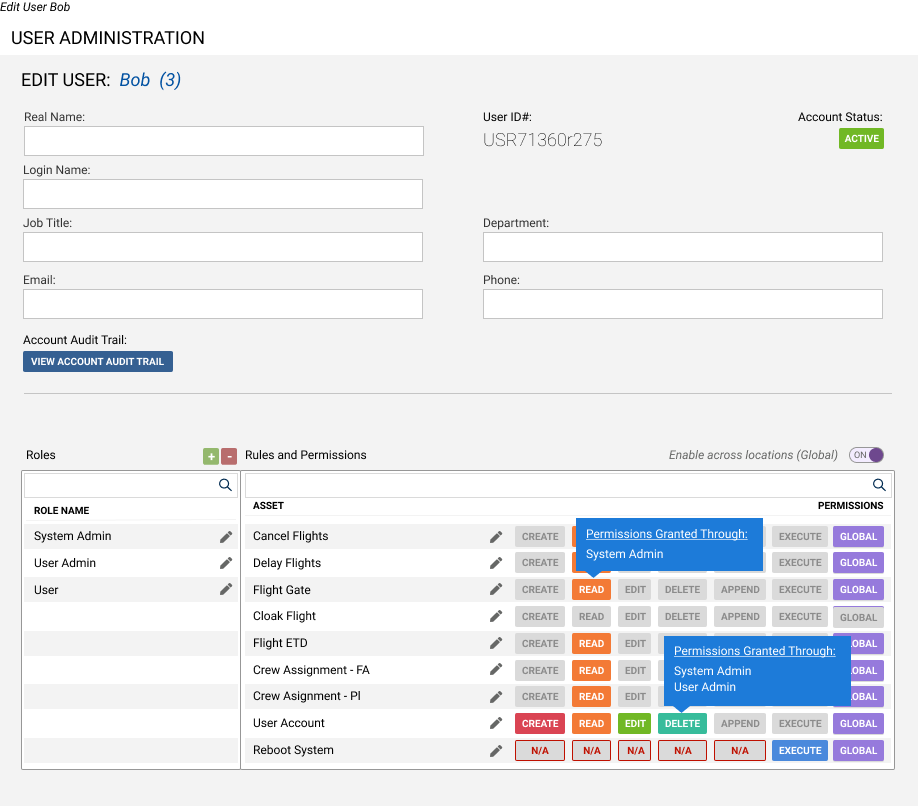
EDITing Overview
These are the editing screens. With these you edit (or create) Roles, add users, and assign permissions. While the System screens are all about visibility into the system as a whole, these are about editing the various components. In this first screen above, we are looking at the configuration for the User “Bob.” When editing these screens the fields at the top (Real Name, Login Name, etc.) are actually filled in by default as they are recorded in the company’s Active Directory system. From here we can see that Bob is a member of 3 Roles (System Admin, User Admin, and User). We see this as both a Role count next to the user name shown as “(3)” and through the listing of assigned Role in the Roles Pane. In addition we see all of the permissions that the user has. For any permissions that is enabled we can hover over it to determine in which Role(s) is that Permission enabled for that Rule. This gives us complete context into the system.
Rule Selected
Here, in Bob’s screen, we can see that when we do select a Rule, the Role(s) (in this case, 2) in which the Permissions are Enabled are highlighted.
Note the “GLOBAL” Permission. In some instances we may want a specific user to only be able to execute certain functions under certain circumstances. Perhaps a Gate Agent can only edit the Flight Gate info for their own home Airport. That is the default. We turn on “GLOBAL” in order to allow them access to editing Flight Gate without restriction. This way we follow the security Best Practices concept of Least Privilege.
Role Editing
Again, Roles are very simple here. When looking at the Role we see the list of users that are members of (assigned to) this Role, and what the specific permissions for this Role are for each Rule. We can see, for example, that for the Flight Gate Rule, the Role of Dispatcher has only Read access. We can also see that Bob, Ted, Alice, Susan, and others (the “45” next to the Role name indicated how many Users are assigned to this Role) are all assigned to this role, and therefore all of them have Read access to the Flight Gate.
Edit Permissions 1
The Permissions Screen has 2 main sections:
The Top section explains what the permissions mean for this specific rule. For example, the “Execute” permission means one thing for a binary program, and it means something completely different for a folder on a file system.
The bottom section is the Edit section. It has both User and Role panes, so that we can see the list of all Users and all Roles that have at least one Permission for the asset “Cancel Flight” enabled.
Notice in this example we have selected the Role “User Admin.” When we do 2 things happen:
We see the list of Users that are member of that specific “User Admin” Role enumerated in the User Panel, and we see above the panels how the Permissions have been configured for that Role. From here you could, for example, enable the Edit permission for the Role “User Administrator”
Edit Permissions 2
This is the same page, but instead we have clicked on a specific User. By doing so we can see what Roles that he is assigned to. We can click on each individual Roles to see the specific Permissions for each Role and edit them.
Again, the hovers allow us greater visibility into the system as a whole, even here, from the edit screens.